The Complete Composting Guide for Beginners: Turn Kitchen Scraps & Garden Waste into Rich Soil

Editorial Disclaimer: This article is for informational and educational purposes only. It is not a substitute for professional medical advice, diagnosis, or treatment. Always consult a qualified healthcare provider or certified herbalist before using any plant for medicinal purposes, especially if you are pregnant, nursing, taking medication, or have a medical condition.
Welcome to the transformative world of composting, where everyday "waste" is not merely managed, but reborn as a vital resource. This comprehensive guide from Flora Medical Global is designed to empower beginners to harness nature's recycling prowess, enriching your garden, reducing your environmental footprint, and fostering robust growth for your beloved medicinal and ornamental plants.
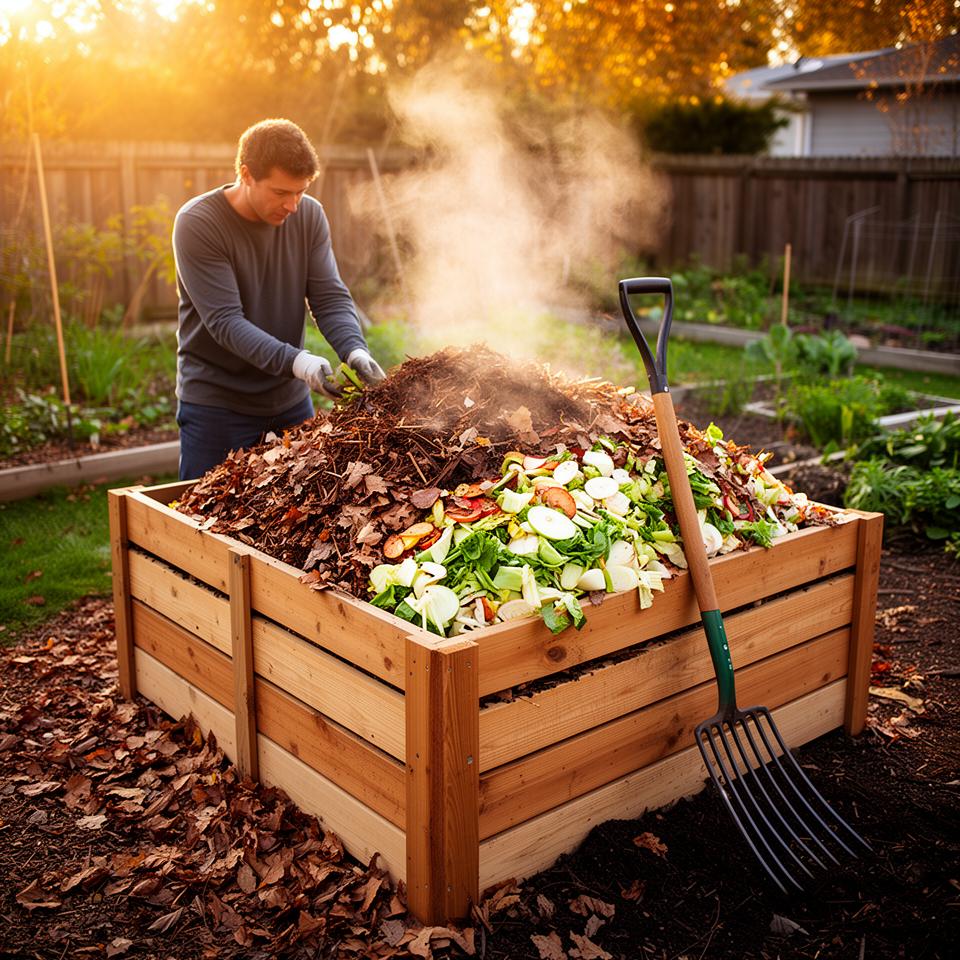
Imagine transforming your kitchen scraps and garden trimmings into a dark, crumbly, nutrient-packed amendment that your plants will adore. This incredible alchemical process, often hailed as creating "black gold" by seasoned gardeners, is surprisingly accessible. We're here to demystify every step, ensuring your journey into organic composting methods is both rewarding and spectacularly successful.
01Understanding Composting: Nature's Ultimate Recycler
Composting is the natural process of decomposition and recycling organic matter into a rich soil amendment known as compost. This biological marvel relies on an intricate community of microorganisms to break down materials, transforming them into a stable, nutrient-dense substance that dramatically improves soil health and plant vitality.
At its core, composting is fundamentally about mimicking the forest floor, where fallen leaves and decaying wood are continuously broken down to nourish new life. This ancient process has been observed and utilized by civilizations for millennia, proving its timeless efficacy. Modern composting simply applies these natural principles in a controlled environment, speeding up decomposition and concentrating fertility.
The Science Behind Decomposition
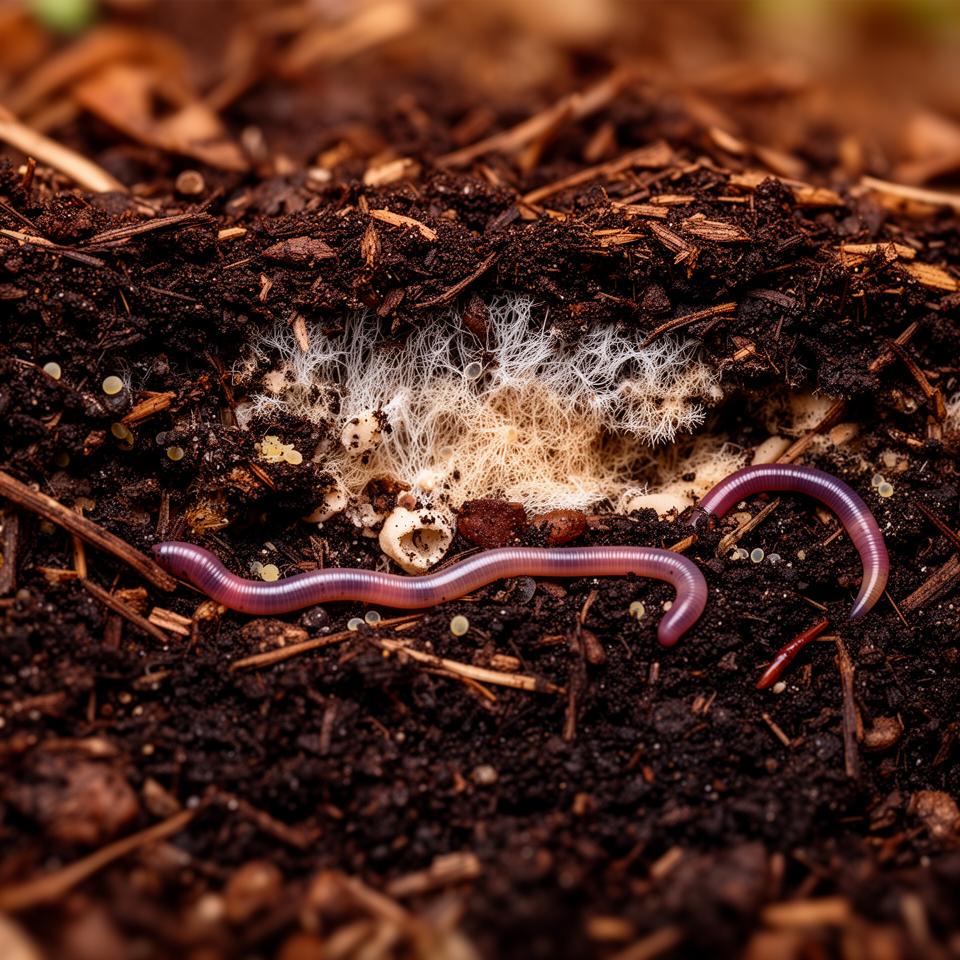
Decomposition is primarily driven by a diverse array of microorganisms, including bacteria, fungi, actinomycetes, and protozoa, alongside macro-organisms like springtails, mites, and earthworms. These microscopic and macroscopic workers diligently consume and break down organic materials, converting complex compounds into simpler forms.
This biological breakdown process generates heat, which is a key indicator of active decomposition and helps eliminate pathogens and weed seeds in well-managed piles. The end product, compost, is a stable humic substance that enhances soil structure, increases water retention, and slowly releases essential macronutrients and micronutrients that plants require for vigorous growth. As researchers at the University of California, Berkeley, highlight, a gram of healthy compost can contain billions of beneficial microbes.
Why Compost? The Myriad Benefits Beyond Waste Reduction
Composting offers a multitude of benefits, extending far beyond simply diverting waste from landfills, providing a holistic approach to environmental stewardship and gardening excellence. Its impact is felt directly in your garden and broadly across ecological systems.
Here's the deal: by integrating composting into your routine, you are actively participating in a circular economy. You're not just reducing trash; you're creating a premium soil amendment that can dramatically improve your garden's health and productivity. The environmental gains are substantial, making every compost pile a small, powerful step towards a healthier planet.
Environmental Benefits of Composting:
- Reduced Landfill Waste: A significant portion of household waste, estimated at 20-30% by the EPA, is organic material that can be composted. This reduces the burden on landfills, which are major sources of methane, a potent greenhouse gas.
- Mitigation of Greenhouse Gas Emissions: When organic materials decompose anaerobically (without oxygen) in landfills, they produce methane. Composting, an aerobic process, primarily produces carbon dioxide, which is less potent as a greenhouse gas over a 100-year timescale.
- Reduced Need for Chemical Fertilizers: Compost provides a slow-release source of nutrients, minimizing the reliance on synthetic fertilizers that can lead to waterway pollution through runoff.
- Enhanced Soil Carbon Sequestration: Incorporating compost into soil can help build soil organic matter, effectively sequestering atmospheric carbon dioxide into stable soil carbon.
- Reduced Water Pollution: By improving soil structure and water retention, compost reduces nutrient runoff into groundwater and surface water bodies, protecting aquatic ecosystems.
Gardening Benefits of Using Compost:
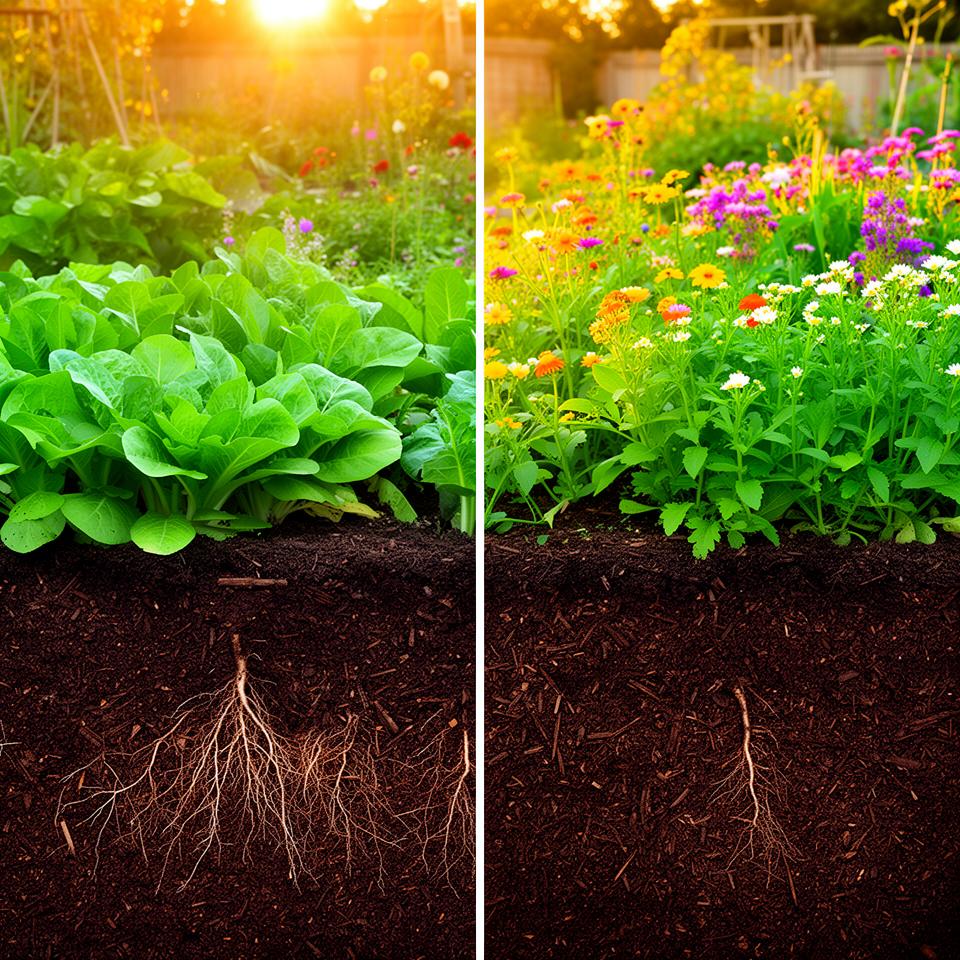
- Improved Soil Structure: Compost helps aggregate soil particles, creating a crumbly structure that allows for better aeration and drainage in heavy clay soils, and increased water retention in sandy soils.
- Nutrient Supply: It provides a slow-release, balanced source of essential plant nutrients, including nitrogen, phosphorus, and potassium, along with crucial micronutrients like iron and zinc. Unlike synthetic fertilizers, compost improves nutrient availability over the long term.
- Increased Water Retention: Organic matter acts like a sponge, holding significant amounts of water. Studies show that for every 1% increase in soil organic matter, soil water holding capacity can increase by 25,000 gallons per acre (Cornell University).
- Suppression of Plant Diseases: Healthy compost harbors a diverse microbial community that can outcompete or directly suppress soil-borne pathogens, leading to healthier plants.
- pH Buffering: Compost has a neutral to slightly acidic pH and helps buffer soil pH, making it more favorable for nutrient uptake across a wide range of plant species.
- Attracts Beneficial Organisms: It encourages the presence of earthworms, beneficial insects, and a thriving soil food web, all of which contribute to soil health and fertility.
02Getting Started: Your First Compost Bin Setup
Setting up your first compost bin is a straightforward process that begins with choosing the right location and an appropriate composting method for your space and lifestyle. The key is to select a system that is manageable, efficient, and fits seamlessly into your gardening routine.
Don't be intimidated; there's no single "perfect" way to compost. Many different methods yield excellent results, so pick one that feels right for you. Think about the amount of organic material you generate, the space you have available, and how much hands-on effort you're willing to invest.
Choosing the Right Composting Method
The best method for you depends on several factors, including your available space, the volume of organic waste you produce, and your desired level of involvement. From simple piles to sophisticated tumblers, options abound.
Consider your living situation: Do you have a large yard, a small balcony, or no outdoor space at all? Each scenario opens up different possibilities. Also, think about your commitment level—do you want a low-maintenance system or are you happy to turn your pile regularly?
Outdoor Composting Methods:
- Compost Piles (Open Piles): This is arguably the simplest method; you just pile up organic materials in a designated area. Advantages include minimal cost and large capacity. Disadvantages include potential for odors, animal pests if not managed well, and slower decomposition if not turned. They can also look less tidy.
- Compost Bins (Stationary Bins): These are enclosed structures, typically made of wood, wire mesh, or plastic. They contain the pile, making it tidier and sometimes helping to retain heat. Bins come in various designs, from simple three-sided structures to more elaborate multi-compartment systems for continuous composting.
- Compost Tumblers: These rotating, enclosed units are excellent for faster composting due to easy turning and better aeration. They are typically pest-proof and more aesthetic. However, they can be more expensive and have a limited capacity, often requiring materials to be added in batches.
- Worm Composting (Vermicomposting): This method uses specific species of earthworms (e.g., red wigglers, Eisenia fetida) to process food scraps. Ideal for smaller spaces and indoor use, it produces rich worm castings and compost tea. It requires careful management of moisture and food types to keep the worms happy. Learn more about vermicomposting here.
Indoor Composting Methods (Apartment/Small Space Friendly):
- Bokashi Composting: An anaerobic fermentation process using inoculated bran to pickle food scraps, including meat and dairy, before burying them or adding to a traditional compost pile. It reduces odors and jumpstarts decomposition.
- Electric Composter: These appliances rapidly break down food waste through grinding and heating, often resulting in a dry, soil-like additive in a matter of hours. While not true compost, it significantly reduces kitchen waste volume.
- Worm Bins: As mentioned above, vermicomposting can be done indoors with proper management, making it an excellent option for apartments.
Here’s a quick comparison of common methods:
| Composting Method | Pros | Cons | Ideal For |
|---|---|---|---|
| Open Pile | Low cost, large capacity | Potential odors, pests, slower | Large gardens, abundant waste |
| Stationary Bin | Tidy, good heat retention | Needs manual turning, various sizes | Medium to large gardens |
| Tumbler | Fast decomposition, pest-proof, easy turning | Higher cost, limited capacity | Small to medium gardens, convenience |
| Vermicomposting | Rich castings, indoor/small space, uses food scraps | Specific food types, temperature sensitive | Apartments, small gardens, avid food waste generators |
| Bokashi System | Handles all food scraps (incl. meat/dairy), reduces odors | Fermented product needs burial/further composting | Indoor use, all food waste, pre-treatment |
Choosing the Ideal Location for Your Outdoor Compost
The location of your compost bin can significantly impact its efficiency and your user experience. A well-chosen spot balances convenience with environmental factors.
Consider these points: accessibility, sunlight, drainage, and proximity to water. Selecting the right spot from the start will make your composting journey much smoother and more enjoyable.
- Accessibility: Place your bin close enough to the kitchen for convenient disposal of food scraps, and near your garden for easy application of finished compost.
- Drainage: Choose a well-drained area to prevent waterlogging, which can lead to anaerobic conditions and odors. Sitting directly on soil helps beneficial organisms access the pile.
- Shade: A partially shaded location is ideal. Direct, intense sunlight can dry out the pile too quickly, while full shade might keep it too cool, slowing decomposition.
- Water Source: Proximity to a water source (like a garden hose) is helpful for maintaining optimal moisture levels, especially during dry spells.
- Airflow: Ensure adequate air circulation around the bin. Avoid placing it against solid walls or fences that could impede airflow.
- Buffer Zone: Maintain a reasonable distance from your home (at least 15-20 feet) and property lines to avoid potential odor issues, though a well-maintained pile should rarely smell bad.
03The Goldilocks Principle: Nailing the Greens, Browns, Water & Air Balance
Successful composting hinges on achieving the correct balance of four key ingredients: "greens," "browns," water, and air. This optimal ratio creates the ideal environment for microorganisms to thrive and rapidly break down organic matter.
Think of it as Goldilocks' porridge: not too hot, not too cold; not too wet, not too dry; not too much carbon, not too much nitrogen. Getting these elements "just right" ensures a fast, odor-free, and efficient composting process that yields beautiful, nutrient-rich compost.
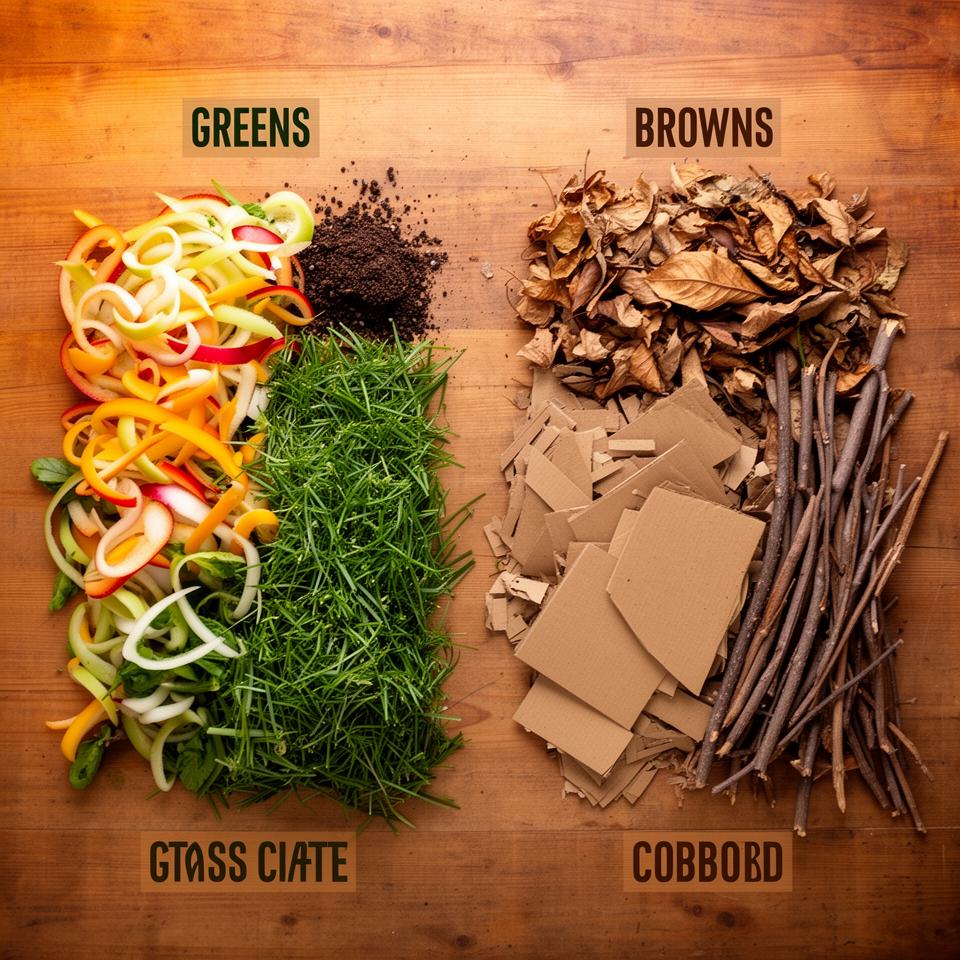
Understanding Greens (Nitrogen-Rich Materials)
Greens are materials rich in nitrogen, essential for microbial growth and reproduction, acting as the protein source for your compost pile. These materials are typically moist, fresh, and often have distinctive colors.
Without enough greens, your pile will break down very slowly. But be careful; too many greens can lead to a soggy, smelly, anaerobic mess. They're quick energy for the microbes, so a little goes a long way when balanced with browns.
- Examples: Fresh grass clippings, fruit and vegetable scraps, coffee grounds and filters, tea bags, fresh plant trimmings, spent flowers, poultry manure (in small amounts), eggshells (crushed).
- Characteristics: High in nitrogen, usually moist, tends to decompose quickly.
- Role: Provides the "fuel" for microbial activity, driving the decomposition process and generating heat.
Understanding Browns (Carbon-Rich Materials)
Browns are carbon-rich materials, providing the energy source and structure for the microbial community, much like the framework of a house. These materials are generally dry, woody, and slow to decompose on their own.
Browns are crucial for balancing the nitrogen from greens, preventing odors, and ensuring good air circulation within the pile. They're the bulk of your compost, giving it substance and preventing it from becoming too dense.
- Examples: Dry leaves, straw, wood chips, shredded paper, cardboard (plain, non-glossy, torn), sawdust, small twigs, pine needles.
- Characteristics: High in carbon, usually dry, tends to decompose slowly.
- Role: Provides energy for microorganisms, prevents compaction, balances nitrogen, and helps maintain proper moisture levels.
The Carbon-to-Nitrogen (C:N) Ratio: The Magic Formula
The ideal C:N ratio for efficient composting is generally cited as 25-30 parts carbon to 1 part nitrogen (25-30:1). This balance ensures that microorganisms have both the energy (carbon) and protein (nitrogen) they need to break down materials effectively.
Think of it this way: too much carbon and the microbes starve for nitrogen, slowing decomposition. Too much nitrogen and they run out of carbon, leading to nitrogen volatilization and ammonia odors. Getting the balance right is key to a fast, odor-free process.
While precise measurement is impractical, aiming for roughly equal volumes of greens and browns is a good rule of thumb. For instance, a layer of grass clippings (green) followed by a layer of dry leaves (brown) often works well. Different sources cite varying ideal ranges; the U.S. Composting Council recommends a C:N ratio of 25:1 to 30:1 for optimal decomposition.
Moisture: Essential for Microbial Life
Just like any living organism, the microorganisms in your compost pile need water to survive and thrive. Optimal moisture content is critical, enabling them to transport nutrients and excrete enzymes necessary for breaking down organic matter.
The ideal consistency is often described as feeling like a wrung-out sponge—damp but not soggy. If it's too dry, microbial activity slows to a crawl; if it's too wet, oxygen is excluded, leading to foul-smelling anaerobic conditions. Aim for 40-60% moisture content.
Aeration: The Breath of the Pile
Composting is primarily an aerobic process, meaning it requires oxygen. Proper aeration allows oxygen to reach all parts of the pile, supporting the beneficial aerobic bacteria that break down materials without producing noxious odors.
Turning the pile regularly is the main way to introduce oxygen, but building the pile with airy materials (like straw or wood chips) also helps create air pockets. Without sufficient oxygen, anaerobic bacteria take over, resulting in unwanted smells like rotten eggs or ammonia. Aim to turn your pile every few days to once a week for active composting.
04What to Compost: The Good, The Bad, and The Stinky
Knowing what to add to your compost pile is crucial for its success, ensuring it decomposes efficiently and remains free of pests and pathogens. Adhering to these guidelines will keep your compost pile healthy and productive.
Explore Our Platforms
This is where many beginners get tripped up, but it's simpler than it seems. Stick to the "do's" and avoid the "don'ts," and you'll be well on your way to creating fantastic compost.
Compostables (The "Do's"):
- Fruit & Vegetable Scraps: Apple cores, banana peels, vegetable trimmings, melon rinds, etc. (Greens)
- Coffee Grounds & Filters: Rich in nitrogen, excellent for greens.
- Tea Bags: Biodegradable bags are fine; remove staples if present.
- Eggshells: Crushed for faster decomposition; adds calcium. (Greens)
- Yard Waste: Grass clippings (thin layers), leaves (shredded helps), spent plants, small twigs (chopped), untreated wood chips. (Greens/Browns)
- Paper Products: Shredded newspaper (black and white ink), plain cardboard (torn). (Browns)
- Hair & Fur: Human hair, pet fur (untreated). (Greens)
- Pine Needles: Acidic in large quantities but fine in moderation. (Browns)
- Sawdust: Only from untreated wood. (Browns)
Non-Compostables (The "Don'ts"):
- Meat, Fish, Bones, Dairy Products: Attracts pests (rodents, flies), creates foul odors, and can contain pathogens.
- Oils & Fats: Can become rancid, attract pests, and slow decomposition by coating materials.
- Diseased Plants: Pathogens may survive composting and spread to your garden.
- Weeds with Seeds: Weed seeds, especially aggressive ones like bindweed or crabgrass, can survive temperatures in home composters and germinate in your garden. Hot composting (see hot composting guide) can kill some, but it's risky for beginners.
- Pet Waste (Dog/Cat Feces): Contains harmful pathogens (e.g., Toxoplasma gondii) that are not reliably killed in home compost piles.
- Coal Ash or Charcoal Briquettes: Contains harmful heavy metals and chemicals.
- Treated Wood: Treated lumber contains chemicals that are toxic to plants and soil organisms.
- Glossy or Coated Paper/Cardboard: May contain inks and coatings that are not biodegradable or desirable.
- Pesticide-Treated Yard Waste: Chemical residues can harm beneficial microbes and persist in the finished compost.
05Composting Methods in Detail: From Passive to Active
Composting methods vary significantly in terms of speed, labor, and space requirements, allowing you to choose an approach that perfectly matches your gardening style and available resources. Whether you prefer a hands-off approach or a rapidly producing system, there's a method for you.
Understanding the nuances of each method will help you make an informed decision and get the most out of your composting efforts. Some methods prioritize ease, while others prioritize speed and efficiency.
1. Cold Composting (Passive Composting)
Cold composting is the simplest and most hands-off method, involving simply piling organic materials and letting nature take its course over an extended period. This approach requires minimal effort but also yields the slowest results.
It’s perfect for those with ample space and patience. Think of it as a long-term, slow-cooker method for your garden. While it won't produce compost quickly, it's virtually foolproof and requires very little maintenance once the pile is established.
- Process: Accumulate organic materials over time in a pile or bin. No active turning is required, though occasional mixing can help.
- Speed: Slow, often taking 6 months to 2 years to produce usable compost.
- Pros: Very low effort, minimal management, ideal for large volumes of less desirable materials (like woody stems).
- Cons: Slow decomposition, may not reach temperatures high enough to kill weed seeds or pathogens, more likely to attract pests if not managed well.
- Ideal for: Gardeners with less time or material, large garden waste volumes, patience.
2. Hot Composting (Active Composting)
Hot composting is an accelerated method that actively manages conditions to promote rapid decomposition, generating high temperatures within the pile to speed up the process and sanitize the compost. This method requires more engagement but delivers finished compost in a matter of weeks or months.
This is the method for those who want results relatively quickly and are willing to put in a bit more effort. The heat generated isn't just a byproduct; it's a vital part of the process, ensuring a clean and potent final product. Active management is key here, but the rewards are well worth it.
- Process: Requires a precise balance of greens and browns (C:N ratio 25-30:1), adequate moisture, and frequent turning. The pile needs to be a minimum size (e.g., 3x3x3 feet or 1 cubic meter) to build and retain heat. Temperatures ideally reach 130-160°F (55-70°C).
- Speed: Fast, often producing usable compost in 1-3 months.
- Pros: Rapid decomposition, kills most weed seeds and pathogens due to high temperatures, fewer pest issues, produces high-quality compost.
- Cons: Requires more attention, labor-intensive (frequent turning), needs a sufficient volume of material to get hot.
- Ideal for: Gardeners who generate a lot of organic waste, desire quick results, and actively manage their pile.
3. Vermicomposting (Worm Composting)
Vermicomposting utilizes specific species of composting worms, primarily red wigglers (Eisenia fetida), to break down organic waste into nutrient-rich worm castings. This method is excellent for food scraps, especially in small spaces or indoors.
These industrious little helpers are incredibly efficient at converting kitchen waste into one of the best soil amendments available. Vermicompost, or worm castings, are packed with microbial life and plant-available nutrients, making them a gardener's secret weapon. Plus, watching the worms work is surprisingly fascinating!
- Process: Worms are housed in a specialized bin with bedding (shredded newspaper, cardboard) and fed food scraps. They consume the organic matter, producing castings.
- Speed: Relatively fast for food scraps, producing usable castings in 2-6 months depending on system size and feed rate.
- Pros: Ideal for food waste, produces highly fertile worm castings, minimal space required, can be done indoors, no turning needed.
- Cons: Cannot process all types of organic material (no meat, dairy, acidic foods in large amounts), requires specific temperature range (55-77°F or 13-25°C), requires careful management to avoid odors or pest issues.
- Ideal for: Apartment dwellers, small-scale food waste, indoor composting, producing premium soil amendment.
4. Bokashi Composting
Bokashi composting is an anaerobic fermentation process originating from Japan, where food scraps, including typically non-compostable items like meat and dairy, are pickled using a special inoculant. This pre-treatment significantly reduces volume and eliminates odors before final burial or addition to a traditional compost pile.
This method doesn't produce finished compost directly, but rather a "pre-compost" that needs further decomposition. However, it's a fantastic solution for managing all types of kitchen waste, especially if you lack an outdoor compost capacity or want to speed up outdoor piles. The result is nutrient-rich fermented material that rapidly breaks down once buried.
- Process: Food scraps are layered in an airtight bin with Bokashi bran (inoculated with beneficial microorganisms like lactic acid bacteria and yeasts). The bin is sealed for 1-2 weeks, fermenting the material.
- Speed: Fermentation takes 1-2 weeks; the fermented material then needs 2-4 weeks to break down in soil or a compost pile.
- Pros: Can handle all food scraps (meat, dairy, oils), eliminates odors during fermentation, speeds up decomposition of final product, excellent for indoor use.
- Cons: Not true composting, requires a second step (burial or adding to traditional compost), initial cost for Bokashi bran and bins.
- Ideal for: Managing all kitchen food waste, urban gardeners, combining with traditional composting, odor-sensitive environments.
06Troubleshooting Common Composting Problems
Even seasoned composters encounter issues, but most common problems can be quickly diagnosed and easily remedied by adjusting one or more of the "Goldilocks" elements: greens, browns, moisture, and air. Don't be discouraged by minor hiccups; they're opportunities to learn.
Remember, composting is a living process. It’s dynamic and will respond to your adjustments. A little observation and understanding of the basic principles will turn you into a composting wizard in no time.
Problem 1: Foul Odors (Rotten Eggs, Ammonia)
Foul odors typically indicate an anaerobic environment, meaning there's not enough oxygen, often combined with an imbalance of greens and browns. Anaerobic decomposition produces gases like hydrogen sulfide (rotten eggs) or ammonia.
This is probably the most common beginner problem, but it’s straightforward to fix. A pungent smell means things are getting too wet and dense, or you have too many nitrogen-rich materials. The solution is usually more browns and more air.
- Cause: Too much nitrogen (greens), too much moisture, not enough aeration, or compaction.
- Solution:
- Turn the pile: Introduce oxygen by thoroughly turning or mixing the compost.
- Add browns: Incorporate dry, carbon-rich materials like shredded leaves, straw, or wood chips. This helps absorb excess moisture and improves air circulation.
- Reduce greens: Temporarily cut back on adding high-nitrogen materials like fresh grass clippings.
Problem 2: Pile isn't Heating Up (Slow Decomposition)
If your compost pile remains cold and decomposition is sluggish, it generally points to an imbalance of materials or insufficient volume for microbial activity to generate and retain heat. A cold pile is simply too relaxed.
A lack of heat means the microbes aren't working hard enough. They're either hungry (not enough greens), too dry, too spread out, or not getting enough airflow to truly thrive. Give them what they need and watch the temperature rise!
- Cause: Too much carbon (browns), not enough nitrogen (greens), too dry, pile too small, or lack of aeration.
- Solution:
- Add greens: Incorporate more nitrogen-rich materials like food scraps, fresh grass clippings, or manure to provide fuel for microbes.
- Moisture: Add water until the pile is damp like a wrung-out sponge.
- Turn & mix: Ensure good aeration and mix materials evenly.
- Increase volume: If the pile is too small (under 3x3x3 feet), it won't retain heat well. Add more materials to build it up.
Problem 3: Pests (Flies, Rodents)
Pests are usually attracted to compost piles when easily accessible food scraps, especially meat, dairy, or oily items, are exposed. Proper management and material selection are key to deterrence.
No one wants uninvited guests in their compost. These pests aren't just annoying; they can spread disease and make your compost less pleasant to work with. The good news is, prevention is the best and easiest cure.
- Cause: Exposed food scraps (especially meat, dairy, fats), improper carbon-to-nitrogen ratio leading to slow decomposition, or an open bin.
- Solution:
- Bury food scraps: Always tuck food waste deep within the pile, covering it with a layer of browns (leaves, soil).
- Avoid problematic materials: Do not add meat, dairy, bones, or oily foods to your outdoor compost (consider Bokashi or local collection for these).
- Maintain balance & heat: A hot, actively decomposing pile is less attractive to pests.
- Use an enclosed bin: A lidded or fully enclosed bin (like a tumbler) can deter larger pests like rodents.
Problem 4: Pile is Too Wet and Slimy
An overly wet and slimy pile indicates too much moisture, which displaces oxygen and leads to anaerobic conditions, slowing decomposition and potentially causing odors. This is often linked to an excess of wet greens.
A slimy compost pile is a suffocated pile. The microbes need air just as much as they need water. When it's too wet, they drown, and less desirable anaerobic bacteria take over, leading to that unpleasant sludge.
- Cause: Too much moisture, too many "greens," not enough "browns" for absorption and structure.
- Solution:
- Add browns: Mix in dry, absorbent materials like shredded newspaper, cardboard, dry leaves, or straw.
- Turn the pile: This helps dry out the pile and introduces oxygen.
- Cover the pile: If it’s exposed to heavy rain, cover it with a tarp or lid.
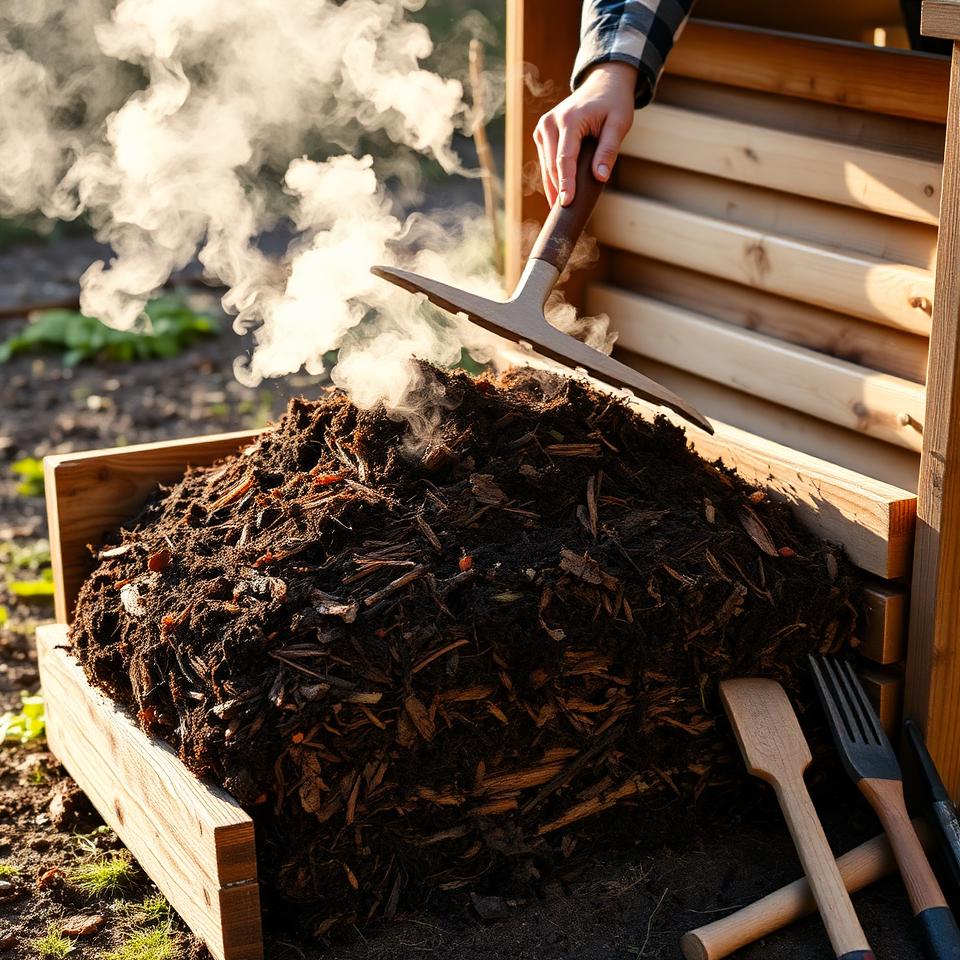
07Harvesting and Using Your "Black Gold"
Knowing when your compost is ready and how to effectively incorporate it into your garden is the rewarding final stage of the composting journey. The transformation from kitchen scraps to rich soil amendment is truly magical.
Once your efforts have paid off, you'll have a beautiful, dark, earthy material ready to supercharge your plants. Using it correctly will maximize its benefits and ensure your garden thrives.
When Is Compost Ready? Signs of Maturity
Finished compost has distinct characteristics that signal its readiness for garden application. It's transformed from a heterogeneous mix into a uniform, stable product.
There are a few key indicators to look for. When you see these signs, you'll know your "black gold" is ready for its starring role in your garden.
- Dark Brown/Black Color: The compost should be a rich, dark color, much like healthy topsoil.
- Earthy Smell: It should have a pleasant, earthy aroma, similar to forest soil, with no lingering odors of rotten food or ammonia.
- Crumbly Texture: The material should be soft, crumbly, and uniform, with most of the original ingredients no longer recognizable. You might still find a few stubborn twigs or fruit pits, which is normal.
- Cool Temperature: An active pile will be warm or hot. Finished compost will be cool to the touch, indicating that microbial activity has slowed down significantly.
How to Harvest Compost
Harvesting your compost depends on your bin type, but the general principle is to remove the finished material from the bottom or core of the pile while allowing unfinished material to continue decomposing.
It's important to separate the fully decomposed material from the still-working parts of your pile. This ensures you're applying only the best, most stable amendment to your garden beds.
- For single bins/piles: Use a garden fork to remove the finished compost from the bottom or interior of the pile. The unfinished material on top can be moved back into the bin to continue decomposing.
- For multi-compartment bins: Once one compartment is finished, empty it and begin filling a new one.
- For tumblers: Stop adding new materials, turn it frequently until finished, then empty the entire contents for a batch harvest.
- Sifting (Optional): For a finer product, you can sift the compost through a screen (e.g., 1/2-inch mesh) to remove any larger, unfinished pieces. These can be returned to a new compost pile.
Using Your Finished Compost ("Black Gold")
Finished compost is an incredibly versatile soil amendment, offering numerous ways to enhance plant growth and soil health throughout your garden. Its benefits are broad and long-lasting.
This is where all your hard work pays off! Applying compost correctly ensures your plants get the full benefit of this rich, organic material. It's like giving your garden a vitamin boost and a long-term health plan all in one.
Application Methods:
- Soil Amendment (General Garden Beds): Incorporate 1-3 inches of compost into the top 4-6 inches of garden soil before planting. This improves soil structure, fertility, and water retention.
- Top Dressing: Apply a 1/2 to 1-inch layer of compost around established plants, trees, and shrubs. This slowly releases nutrients, suppresses weeds, and retains moisture.
- Potting Mix Component: Mix 1 part compost with 2-3 parts soil or sterile potting mix for an enriched, homemade growing medium. Ensure your compost is fully mature and doesn't contain active weed seeds if using for seed starting.
- Compost Tea: Steep finished compost in water for 1-3 days (with aeration) to create a liquid fertilizer rich in beneficial microbes. Dilute and use as a foliar spray or soil drench to boost plant health and disease resistance.
- New Plantings: Add a shovelful or two of compost to the bottom of planting holes for new trees, shrubs, or perennials to give them a strong start.
- Lawn Care: Spread a thin layer (1/4 to 1/2 inch) of sifted compost over your lawn in spring or fall, then rake it into the grass. This enhances soil health and nutrient cycling.
Using compost is an ongoing process. The more you add, the healthier your soil becomes, leading to less need for synthetic inputs and more resilient, thriving plants – particularly important for the careful cultivation of Flora Medical Global's medicinal plants.
08Advanced Composting Techniques
Once you've mastered the basics, several advanced composting techniques can further optimize your process, allowing you to compost more efficiently, in smaller spaces, or handle specific waste streams. These methods build upon the fundamental principles but introduce specialized tools or approaches.
Ready to level up your composting game? These techniques can help you tackle challenges like limited space, difficult materials, or the desire for even faster results. They demonstrate the versatility and continuous innovation within the world of organic recycling.
Sheet Composting (Compost-in-Place)
Sheet composting, also known as "lasagna gardening," involves layering organic materials directly onto garden beds or lawns, allowing them to decompose in situ without a traditional compost pile. This method enriches soil directly where plants will grow, improving soil structure and fertility over time with minimal digging.
It's a fantastic, low-effort way to build soil and suppress weeds, creating rich garden beds right where you want them. You're essentially building a slow-composting pile directly into your garden. It’s perfect for converting a lawn into a garden bed without having to double-dig.
- Process: Lay down alternating layers of wet "greens" and dry "browns" directly onto the ground, often starting with a layer of cardboard to suppress existing vegetation. Over time, these layers break down to create a fertile planting bed.
- Pros: Builds soil directly in place, suppresses weeds, conserves water, no turning or separate compost bin needed.
- Cons: Slower decomposition, can be unsightly during decomposition, may attract pests if food scraps are not buried deeply, cannot kill weed seeds or pathogens effectively.
- Ideal for: Creating new garden beds, no-dig gardening, amending large areas, long-term soil building.
Trench Composting
Trench composting is a simple, effective method where food scraps and other organic matter are buried directly into the garden soil, allowing worms and soil microbes to decompose them underground. This method is particularly discreet and pest-resistant, making it excellent for small yards or specific zones within larger gardens.
It’s a truly invisible way to compost, integrating nutrients directly into your garden's root zone while keeping materials out of sight and smell. It’s an ancient technique for good reason: it works wonders without much fuss. Just dig, bury, and let the soil ecosystem do the rest.
- Process: Dig a trench or hole 8-12 inches deep between rows of plants or in an unused area of the garden. Fill the trench with food scraps and other compostable materials, then cover completely with soil.
- Pros: Very discreet, highly pest-resistant, enriches soil directly where plants will benefit, provides slow-release nutrients without a separate compost pile.
- Cons: Cannot accept large volumes at once, requires digging, decomposition can be slower than hot composting, only suitable for garden areas.
- Ideal for: Small batches of food scraps, discreet composting, direct nutrient delivery to specific garden zones.
Compost Tea Brewing
Compost tea is a liquid extract made by steeping finished compost in water, creating a nutrient-rich solution teeming with beneficial microorganisms. This "liquid gold" can be used as a foliar spray or a soil drench to directly inoculate plants with microbes and provide a burst of nutrients, boosting plant health and resilience.
It's like brewing a potent elixir for your plants, delivering concentrated microbial diversity directly to their leaves and roots. This method allows you to extend the benefits of your valuable compost to a wider area or target specific plant needs with precision control.
- Process: Place finished compost (or worm castings) in a porous bag (e.g., old pillowcase or burlap) and submerge it in aerated, chlorine-free water. Aerate for 12-36 hours using an aquarium pump to ensure an aerobic brew.
- Pros: Applies beneficial microbes directly to plant surfaces and soil, improves nutrient uptake, enhances disease resistance, can be used as a foliar feed.
- Cons: Requires equipment (airstone, pump), best used immediately after brewing to maximize microbial viability, effectiveness varies with compost quality and brewing conditions.
- Ideal for: Boosting plant immunity, nutrient delivery, large gardens, improving soil microbiology.
09Frequently Asked Questions About Composting
What is the ideal ratio of greens to browns?
The ideal carbon-to-nitrogen (C:N) ratio for efficient decomposition is approximately 25-30 parts carbon to 1 part nitrogen. In practical terms, this usually translates to roughly equal volumes of greens and browns in your compost pile. For example, if you add a bucket of fresh grass clippings (greens), add a similar volume of dry leaves or shredded paper (browns).
How often should I turn my compost pile?
For hot composting, turning the pile every 3-7 days is recommended to provide aeration and redistribute materials, significantly speeding up decomposition. For cold or passive composting, turning is optional, perhaps once a month or whenever you add new material, but the process will be much slower.
Why does my compost smell bad?
A foul smell (like ammonia or rotten eggs) is usually a sign of an anaerobic pile, meaning it's too wet and lacks oxygen. This can be caused by too many "greens" (nitrogen-rich materials) or insufficient turning. To fix it, add more dry "browns" (shredded leaves, straw) to absorb moisture and improve air circulation, then turn the pile thoroughly.
Can I compost citrus peels?
Yes, citrus peels can be composted, but in moderation, particularly in hot composting systems. Their acidity can slow decomposition slightly if added in very large quantities, and their essential oils may be unappealing to worms in vermicomposting bins. Chop them into smaller pieces to speed up their breakdown.
Is it okay to add pet waste to my compost?
No, it is generally not recommended to add dog or cat feces to home compost piles. Pet waste can contain harmful pathogens (like Toxoplasma gondii, E. coli, and roundworms) that may not be reliably killed by the temperatures achieved in typical home composting systems. This can pose a health risk if the compost is later used on edible plants. Manure from herbivores (e.g., horses, cows, rabbits, chickens) is generally safe, given proper composting.
How long does it take to make compost?
The time it takes to produce finished compost varies widely depending on the method and management. Hot composting can yield usable compost in as little as 1-3 months. Cold or passive composting typically takes 6 months to 2 years. Vermicomposting can produce worm castings in 2-6 months.
Can I compost weeds?
You can compost many weeds, but be cautious with weeds that have gone to seed or are notoriously invasive (e.g., bindweed, ivy, thistle). The high temperatures of a well-managed hot compost pile (130-160°F or 55-70°C) can kill most weed seeds and pathogens. However, in cooler piles, seeds may survive and spread in your garden. It's often safer to avoid composting seedy weeds or those with persistent root systems unless you are confident in your pile's heating capabilities.
What size should my compost pile be?
For efficient hot composting, a pile that is at least 3 feet wide, 3 feet long, and 3 feet high (1 cubic meter) is often recommended. This minimum volume allows the pile to build and retain enough heat for rapid decomposition. Smaller piles tend to stay cooler and decompose more slowly.
What should I do if my compost is too dry?
If your compost pile is too dry and crumbly, microbial activity will slow down significantly. To re-moisten it, gently spray the pile with water while turning, aiming for the consistency of a wrung-out sponge. Avoid over-saturating it, as this can lead to anaerobic conditions.
Can I put moldy food in compost?
Yes, moldy food is perfectly fine for your compost pile. Mold is a type of fungus, and fungi are essential decomposers in the composting process. As long as it's a type of food that's otherwise compostable (like fruits, vegetables, bread), the mold will simply contribute to the breakdown of organic matter.
How often should I add new materials?
You can add new materials to your compost pile whenever you accumulate them. For continuous composting, a good practice is to add a layer of "greens" (e.g., kitchen scraps) and then immediately cover it with a layer of "browns" (e.g., dry leaves, shredded paper). This helps maintain the C:N balance, prevents odors, and minimizes pest attraction.
Can I compost cardboard?
Yes, plain, non-glossy cardboard (like cereal boxes or delivery boxes) is an excellent "brown" material. It adds carbon, structure, and helps aerate the pile. Just be sure to shred or tear it into smaller pieces to facilitate faster decomposition, and remove any tape or labels.
10The Complete Composting Guide for Beginners: Conclusion
Composting is a profoundly rewarding practice that transforms organic waste into a valuable resource, benefiting your garden, your wallet, and the planet. By understanding the simple science behind decomposition and applying the "Goldilocks" principle of balancing greens, browns, moisture, and air, anyone can become a successful composter.
From robust outdoor bins to discreet indoor worm farms, there's a composting method suited for every lifestyle and space. Embrace this natural cycle, and you'll soon be nurturing healthier soil, growing more vibrant plants, and contributing to a sustainable future, one rich shovelful of "black gold" at a time.
Here at Flora Medical Global, we champion sustainability in all its forms, seeing composting as an integral part of holistic plant care and ecological stewardship. Your journey into composting is a direct investment in the health of your plants and the vitality of our shared earth. We encourage you to start today, experiment, and enjoy the transformative power of this ancient practice.
11The Complete Composting Guide for Beginners: References & Further Reading
Authoritative sources and related guides:
- Wikipedia — background reference
- PubMed — peer-reviewed studies
- Kew POWO — botanical reference
- NCBI PMC — open-access research
- WHO — global health authority
Related on Flora Medical Global
Reviewed by the Flora Medical Global Botanical Review Panel
Multi-disciplinary editorial group · Botany · Ethnobotany · Herbal-medicine literature
Who reviewed this: This page was checked by the Flora Medical Global Botanical Review Panel — an in-house editorial group of botany graduates, ethnobotany researchers, and horticulture practitioners who collectively maintain our 7,000+ plant encyclopedia. Meet the team.
Our 4-step verification process
1. Taxonomic verification
Scientific names and synonyms cross-checked against Kew POWO, World Flora Online, and The Plant List.
2. Phytochemical & medicinal cross-reference
Active compounds, traditional uses, and reported activities are cross-referenced with PubMed, USDA Dr. Duke's database, and peer-reviewed ethnobotanical literature.
3. Conservation & distribution check
Distribution, ecology, and conservation status confirmed against GBIF occurrence records and the IUCN Red List.
4. Editorial & safety review
Every entry passes an editorial pass for clarity, originality, and safety notices (toxicity, contraindications, dosage caveats) before publication.
Last reviewed:
Important medical disclaimer: This content is for educational and research purposes only. It is not medical advice and is not a substitute for consultation with a licensed healthcare provider. Do not use any herb to self-treat a medical condition without professional guidance.
Explore Our Platforms
Comments (0)
No comments yet. Be the first!